
IPv6 (Internet Protocol version 6) is the latest addition to Internet Protocols. It is much better than IPv4, offering distinctive IP addresses that are essential for Internet-enabled devices to communicate. We have learnt of various validation rules for inputs. Lets learn how to Validate Internet Protocol (IPv6) input field in a simple Laravel 9 app.
To integrate the validation for IPv6, we will use the default request method by Laravel and Bootstrap 5.
Validate Internet Protocol (IPv6)
Step 1: Create Laravel App
Create a new Laravel project by passing in the composer command below at the desired location where you want your project to be at.
composer create-project --prefer-dist laravel/laravel laravel-ip_protocolNavigate to the project’s root directory.
cd laravel-ip_protocolStep 2: Create new Controller
A controller class handles the core logic for Laravel apps. You will also define input validations in a Controller class.
Go to your terminal and simply invoke the command below.
php artisan make:controller ItemControllerOnce the ItemController is created, we will populate it.
Navigate to the app\Http\Controllers\ directory and look for ItemController.php file. In this file you have to paste the code below.
<?php
namespace App\Http\Controllers;
use Illuminate\Http\Request;
use Illuminate\Support\Facades\Blade;
class ProductController extends Controller
{
    public function ipv6form()
    {
        return view('index');
    }
    public function validateForm(Request $request)
    {
        $request->validate([
            'ip_address' => 'required|ipv6',
        ]);
        dd('Form submitted successfully!');
    }
}
The Item Controller class, will have two functions to handle the view blade for a form that takes in the ip_address and the second function for required validation for the IPv6 input field.
The validate function assures that IP address gets validated. The validation rules of required and ipv6 are used for it.
Step 3: Define Routes
Now, navigate to the routes/ folder, open the web.php file and add the given code into it.
<?php
use Illuminate\Support\Facades\Route;
use App\Http\Controllers\ProductController;
/*
|--------------------------------------------------------------------------
| API Routes
|--------------------------------------------------------------------------
|
*/
Route::get('/my-form', [ProductController::class, 'ipv6form']);
Route::post('/submit-form', [ProductController::class, 'validateForm'])->name(
    'validate.ip'
);
Step 4: Build Form with Bootstrap
Next, go to your resources/views/ folder, and create an index.blade.php file. Insert the code below into your view file.
<!DOCTYPE html>
<html>
<head>
    <title>Laravel IPv6 Validation - scratchcoding.dev</title>
    <link href="https://cdn.jsdelivr.net/npm/bootstrap@5.1.3/dist/css/bootstrap.min.css" rel="stylesheet">
</head>
<body>
    <div class="container mt-5">
        @if (count($errors) > 0)
            <div class="alert alert-danger">
                @foreach ($errors->all() as $error)
                    {{ $error }} <br>
                @endforeach
            </div>
        @endif
        <form action="{{ route('validate.ip') }}" method="post">
            @csrf
            <div class="mb-3">
                <label>IP Address</label>
                <input type="text" class="form-control" name="ip_address">
            </div>
            <div>
                <button class="btn btn-danger">Send</button>
            </div>
        </form>
    </div>
</body>
</html>
You should add the bootstrap CSS link in the head section that will help you create a form using bootstrap form UI component.
Then define the form tag, pass the route that will make the post request and evoke the server side validation for IPv6 form field.
Step 5: Test IPv6 Validation
Lastly, run the Laravel development server, and execute the given command to run the app.
php artisan serveOpen your browser and go to the URL below to test you app:
http://127.0.0.1:8000/my-form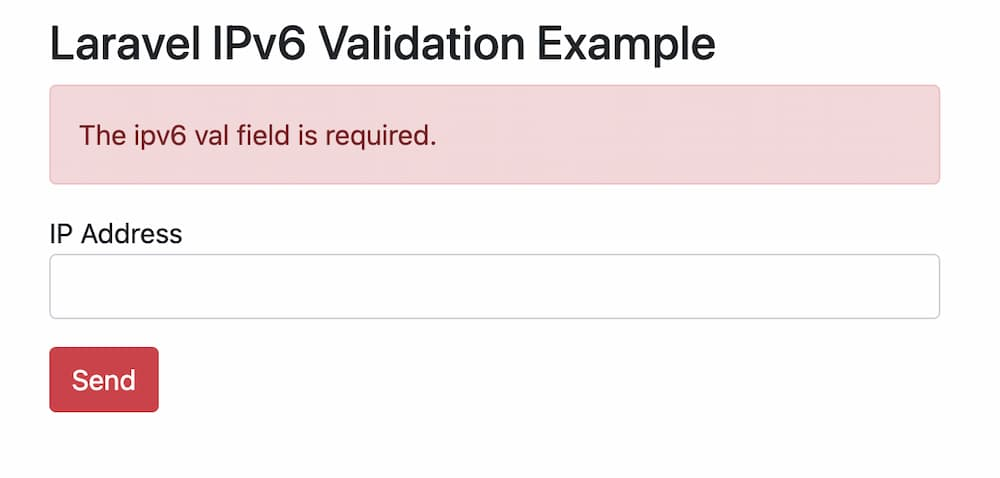
Conclusion
To sum up, the guide helped you understand the simple Laravel setup for validating the IPv6 in Laravel.


